Tuesday 19 November 2013

Saturday night is not  about the rumba, tango and foxtrot, it's strictly about the hair baby! We love witnessing the hair transformations that take place on every contestant each week. Hairspray at the ready, here are some of our favourite styles from this series.

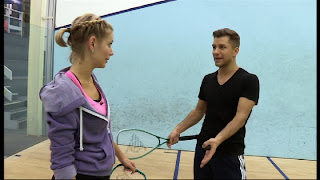
Susanna Reid Strictly Come Dancing
Fabulously versatile long brunette locks

Natural style

Ponytail plait

Curls galore!

Pinned up beauty


Rachel Riley Strictly Come Dancing
Sort-haired blonde bombshell

Ponytail hairpiece

Accessorised

Training ponytail


Sophie Ellis-Bextor Strictly Come Dancing
Flowing brunette hair styled in different ways 

High up-do

Effortless loose curls

60s faux bob

V-shaped fringe

Tuesday 12 November 2013

Today I finished my first glow-fur project.  It's a glowing silver-and-white fur lined jacket, and the cuffs and collar fur glow with delicious rainbow colors and animations.

I used Adafruit's Gemma chip along with their neopixels and neopixel strips.  The jacket is powered by a lithium polymer battery that's surprisingly light and really strong.  I think I'm hooked on lithium polymer.  This thing is awesome.

This jacket was kind of a nightmare to make.  Electronics can be so petulant if they don't get exactly what they want, when they want it, and prototypes are notoriously fiddly anyway even without the electricity to muddle things up.  I remade almost every part of this jacket at least twice, and I'm still not 100% satisfied with it, but I am 500% HAPPY with it.

The cool thing about using the Adafruit pixels is that each one is individually addressable.  What does that mean?  It means that I can plug this jacket into my Mac, and tell it what color combinations I want, or what animations it should run, or how bright it should be or any number of wonderful things.  If I want it fading from purple to red to purple I can do that, or I can let the rainbow colors shine.  

I've also got the option of adding on motion sensors, color sensors, or GPS sensors (so I can have it light up when I get to Starbucks, or whatever - I haven't quite figured out the why's of that one yet).  There's so much to learn.  It's a little overwhelming. 

But right now I have a sparkly rainbow light up jacket.  Squee!

Monday 11 November 2013

I woke up in the middle of the night and heard a very odd sucking noise in the bathroom.  Bleary-eyed, I stumbled in there and saw something purple and squishy slurping up out of the drain.  I don't know how he got there or where he came from, but soon my giant bathtub was filled with purple madness.  He sat there, blinking innocently at me.


I backed slowly into the hall, giving him space.   He seemed harmless enough, and only a little bit lost and confused.  Even in my bleary-eyed state I could see that he seemed tired.  


I invited him downstairs and offered him sustenance.  It seems he was more in need of a comfortable, safe place to rest and refresh his obviously gigantic and under stimulated brain.


I could see his eyes light up with wonder and fascination as he paged his way quickly through Bilbo's Unexpected Journey.  His large cranial cavity began to pulse excitedly as his tentacles flipped the pages with rapid excitement.


He slurped into the office and began researching, muttering quietly to himself as he gathered his thoughts.  I tried to peek over his shoulder but, since he lacks shoulders, I couldn't catch a glimpse of his focus, though I thought I spotted him plotting a course on Google Maps to a dark, watery garden.


Determined, he slurped into the garage and tried desperately to make a break for freedom.  He was thwarted only by his inability to find the button for the garage door.  I did not offer my assistance.


Distracted for a moment, I turned away.  When I looked back, the giant squid had appropriated a more suitable mode of transport.  The last I saw of him, he was pedaling quickly and expertly down the street, heading into an unknown adventure.  

Saturday 9 November 2013

It's officially upon us, the pixie hair trend is spreading faster than wildfire with recent devotees including Pamela Anderson and Jennifer Lawrence. More and more people are going for the chop including these lovely ladies:

Julie Etchingham, ITV News
Blonde Boy to Boyishly Short


Katy FawcettShort Hair Love


Miley CyrusPixie Versatility


Wednesday 6 November 2013

I've been modifying my light-up shoes and now they're extra-awesome.

I got some new velostat, which works a treat.  The velostat is a pressure sensitive material which basically gets turned into a sensor, so the shoes light up when I step down, instead of just being on all the time.  Yay for interactive stuff!!

I have to say, interactivity is my favorite thing about learning all this arduino voodoo.  I have made loads of web pages and done plenty of online imaging and making-of-pretty-things that appear on my computer screen in the "virtual world".  I've also made plenty of fashion and clothing from drawings or patterns in the "real world".  The thing that's floating my boat about arduino is the connection between the two.. I make a computer program and it changes something in the real world instead of just on-screen.  This, is magic.  

I can't wait to start adding accelerometers and motion sensors and stuff to my clothing.  I also want to make stuff that's remote controllable like my fairy lights.  The learning curve is pretty steep, but I'm finding myself in that exciting phase of discovery where every project opens up a whole new world and things are actually starting to make sense, instead of just respond when I poke at them.  I've got a very long way to go, but I'm having an absolute blast along the way.

So!  Here are my light-up shoes in new-and-improved action.  I used the firewalker code from Adafruit, and tweaked it so it works with the gemma chip I'm using.  I also figured out how to slow it way down - the code is written for a series of around 50 LEDs and I'm just using 5, so the animation went by too fast on the 5 LEDs.  I also tweaked the color a whole lot, but then ended up just changing it back to the original red-yellow-black-with-sparklies because, well, it's AWESOME.


Tuesday 29 October 2013

I have always wanted a pair of light-up shoes.  All the kids are wearing them.  They can stomp and their shoes light up with red or blue or sparkly and I've always been SO JEALOUS.

Tonight, I finished my very first set of light-up shoes.  I never, EVER want to take them off.  Yes, I am standing here, writing this, in light-up shoes.
light up boots
It's very hard to photograph the outside of your own ankles.
I was inspired by this Firewalker Shoes Tutorial from Adafruit.  If you haven't ever poked around Adafruit, I highly recommend it - they have lots of light-up wearables tutorials and inspiration.  I want one of EVERYTHING.  

I don't like the Vans/Converse look so much so I decided to use a comfy pair of boots I had in the garage.  They are pretty cute and steampunk-y with buttons up the sides, but one of the buttons had come off and they'd been migrating to the back of the shoe closet.  I have a feeling they're never going to get forgotten about again.

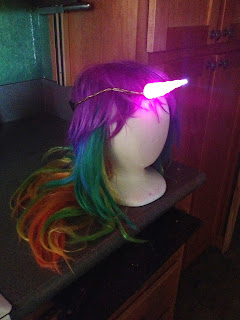
I removed all the buttons and wired up 5 of Adafruit's neo-pixels to a brand-new Gemma.  This is the first time I'd used a Gemma, but I have a little experience with the neopixels thanks to my light-up unicorn horn project.  (What?  I haven't blogged about the light-up unicorn horn yet???  Here's a pic:
light up unicorn horn
Rainbow Unicorn FTW!
I promise to go into detail about this project at some point.. maybe after the Halloween madness dies down)

I sewed the neopixels into the holes where the buttons had been, and sewed clear iridescent buttons onto the outside, and buttoned the shoes back up.  The iridescent buttons catch and diffuse the light from the neopixels and look just gorgeous.  They run off 3 AAA batteries, and the battery pack just slips nicely down inside the boots - I don't even notice it.

I originally wanted to add a velostat pad under the heel so the lights would react when I stepped down, like in the Firewalker tutorial, but the velostat I got was part of a bad batch and didn't work right.  I've ordered some more and will probably add this functionality in later on.

Regardless, I am absolutely DELIGHTED with how they turned out.  The Gemma uses a simplified (?) form of Arduino, and between the unicorn horn and this project, I'm starting to figure out how to tweak the code to get the lights to do cool things.  Each project is a little more exciting and a little fancier.

You know where this is all leading, right?  There will be a light-up swimming mermaid tail sometime in the not-too-distant future.  Oh, yes there will.


light-up boots


Thursday 17 October 2013

BBC Wales news presenter Lucy Owen always has great hair sporting a blunt bob complemented by a straight fringe but a recent trim has taken her hair to the next level. The short bob and fringe looks fantastic on her, why not try it yourself!?

Lucy Owen, From Longest To Shortest


Tuesday 15 October 2013

As the weather's started turning colder it's our newsreaders and weather presenters who've been turning heads with a serious amount of locks hitting the hairdresser's floor. We've made a list of brunette beauties below which we think illustrates our point!

Clare Nasir
Shorter and shorter for this stunning weather presenter. The question is, what style is next!?


Nina Hossain
A serious trim for the ITV newsreader, what a beautiful bob


Olivia Wayne nee Godfrey
Serious amount of length lost for Sky Sports News host


Saturday 12 October 2013

First of all an explanation for my American readers.  Here in the UK when we say coffee cake we mean a cake that is flavoured with coffee.  Makes sense to me!

Anyway, recently I was sorting through some family photos and came across this one of my mom.  From the colour of the mix in the food processor I knew immediately what she was making.  This coffee cake.  Among anyone who knew of her baking she was famous for this cake and it was SO easy!  I wonder if they all knew how easy it was if they would still have thought she was so amazing for making it.

052

I knew I had to make the cake yesterday and had all the ingredients in. I remembered how much butter, flour and sugar to each egg, that's easy, but I wasn't sure about how much coffee or baking powder and how long to cook it, but I had a go and it turned out ok.

DSCF6069-001

Pin It

You will find a printable version of the recipe at the bottom of the post.

First off, preheat your oven to 180c. (That's 360f for my American friends). I remembered that OK.
Now I had to decide how much mixture to make. I knew that when my mom made this cake it used to have a 6 egg mix but she had these HUGE cake tins. Since I only wanted to use 8 inch tins, I decided a 3 egg mix would be enough.

Whenever my mom made this cake she always took the time to grease AND flour the tins, so I did the same.

First, grease your tins as normal, then put a tbsp or so of flour into them, and tip the tin until you have coated all surfaces with the flour. I am sure cake release spray would do the same job BUT I am trying to stick to what my mom did here, so I went with greasing and flouring.

Coffee Cake 01

Coffee Cake 02

Coffee Cake 03

Measure your flour, baking powder, sugar and butter into the bowl of your processor and then add the 3 eggs, having cracked them into a bowl first in case you get a bad one or any shell falls in.

Coffee Cake 06

Before you start mixing the cake, make up your coffee. I am not sure I have the amount of coffee right. I have upped the amount slightly from what I used, in the recipe below, but think it might still need more. We had the amount in the icing right but the cake could have taken more coffee flavour. Add as little boiling water as you can to make it up and then thin it out a bit with cold water, which also brings the temperature down.

Coffee Cake 05

Now back to the food processor. Mix on med high (or pulse) until the mixture is combined and smooth. Then add the coffee in a thin stream through the spout on the processor.

Coffee Cake 08

After a few more seconds your mix should look something like this.

Coffee Cake 09

Divide the mixture between your two cake tins.

Coffee Cake 10

Spread it out in the tins as evenly as you can.

Coffee Cake 11

Then place them in the preheated oven.

Coffee Cake 12

Leave to cool in the tin for 5 minutes.

Coffee Cake 13

Remove from the tins to a cake rack and leave until completely cooled.

Coffee Cake 14

Once the cake has cooled ice the top. You do this before filling the cake because the whipped cream is soft and you might squish it out if you ice after filling it.
Make up another small portion of strong instant coffee, 1 tsp of granules with about 1tbsp water, then make up some icing using that as your liquid. While the icing is still wet, sprinkle the walnuts over the top. My mom always used walnut halves when possible and used one to mark each portion of the cake. I only had walnut pieces, so I sprinkled instead.

Coffee Cake 15

Once the icing has set nicely you can whip the cream and get ready to fill the cake. I used 300ml of double cream here and you can see from the later photos it is quite a thick layer. But maybe that is what makes this cake so nice.

Coffee Cake 17

Pop the top on and your cake is ready to serve. If not serving immediately, keep chilled because of the cream.

Coffee Cake 19

Was it good? Yes, amazing! Was it as good as I remember? Not quite, it came out a little dense but there are a couple of things I know were not quite right. First I was using free range eggs from a family member's chickens, and they were on the small side, I am sure slightly larger eggs would have made a difference. Secondly I made the coffee up with as little water as possible and I think it could have taken a tbsp or so more. Finally I couldn't remember how much baking powder my mom used and guessed. I have upped it slightly for the recipe below and hopefully with those 3 things it should come out much better next time.

Coffee Cake 20

Coffee Cake 23

DSCF6069-001

Printable version:

My Mom's Coffee Cake
Coffee Flavoured cake my mom used to make that was always a success no matter where we took it!

Prep Time: 15 minutes
Total time: 20 minutes

Serves: 8 decent slices

Ingredients:

6 oz self raising flour,
6 oz caster sugar,
6 oz soft margarine, (I used butter because it was what I had),
3 medium eggs,
2 tsp baking powder,
2 1/2 tsp instant coffee,
1/2 cup icing sugar, I didn't measure this,
Handful walnuts,
Whipping cream or double cream.

Instructions:

1. Grease and flour your cake tins.
2. Preheat the oven to 180c.
3. Set up your food processor with the normal blade.
4. Measure the first 5 ingredients directly into the bowl.
5. Take 1 1/2 tsp instant coffee and make up with a little boiling water.  Cool with a little additional cold water.
6. Switch your processor on to med high until all the first ingredients are mixed, then pour the made coffee in through the spout while the mixer is still moving.
7. Divide the mixture between your two tins and spread evenly in the tins.
8. Bake in the preheated oven until it begins to come away from the sides of the tin, is springy in the middle and a cake tester or fine knife blade comes out clean when inserted into the cake. For the size pans I used this took about 20 minutes, but I would recommend checking at about 15 minutes.
9. Remove from the oven and cool in the tins for 5 minutes.
10. Turn out onto a cake rack to cool completely.
11. Make up the remaining instant coffee with a little boiling water and a little cold to cool it back down.
12. Make up the icing sugar with as much of the coffee as you need to make a consistency that will spread easily but without being too runny.
13. Decide which of the cakes will be the top and spread the icing over it. Sprinkle the walnuts over that and leave to set.
14. Once the icing has set you can whip the cream and fill the middle of the cake. If your bottom cake is a bit uneven you may need to slice some off it to get it to sit flat first.
15. Keep chilled (because of the cream) and serve!


You can check out the sites I link up to over in my sidebar. Before you go, why not check out my recipes index page, or my craft projects index page, I am sure you will find something there to interest you.