Tuesday 29 October 2013

I have always wanted a pair of light-up shoes.  All the kids are wearing them.  They can stomp and their shoes light up with red or blue or sparkly and I've always been SO JEALOUS.

Tonight, I finished my very first set of light-up shoes.  I never, EVER want to take them off.  Yes, I am standing here, writing this, in light-up shoes.
light up boots
It's very hard to photograph the outside of your own ankles.
I was inspired by this Firewalker Shoes Tutorial from Adafruit.  If you haven't ever poked around Adafruit, I highly recommend it - they have lots of light-up wearables tutorials and inspiration.  I want one of EVERYTHING.  

I don't like the Vans/Converse look so much so I decided to use a comfy pair of boots I had in the garage.  They are pretty cute and steampunk-y with buttons up the sides, but one of the buttons had come off and they'd been migrating to the back of the shoe closet.  I have a feeling they're never going to get forgotten about again.

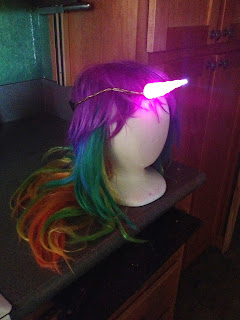
I removed all the buttons and wired up 5 of Adafruit's neo-pixels to a brand-new Gemma.  This is the first time I'd used a Gemma, but I have a little experience with the neopixels thanks to my light-up unicorn horn project.  (What?  I haven't blogged about the light-up unicorn horn yet???  Here's a pic:
light up unicorn horn
Rainbow Unicorn FTW!
I promise to go into detail about this project at some point.. maybe after the Halloween madness dies down)

I sewed the neopixels into the holes where the buttons had been, and sewed clear iridescent buttons onto the outside, and buttoned the shoes back up.  The iridescent buttons catch and diffuse the light from the neopixels and look just gorgeous.  They run off 3 AAA batteries, and the battery pack just slips nicely down inside the boots - I don't even notice it.

I originally wanted to add a velostat pad under the heel so the lights would react when I stepped down, like in the Firewalker tutorial, but the velostat I got was part of a bad batch and didn't work right.  I've ordered some more and will probably add this functionality in later on.

Regardless, I am absolutely DELIGHTED with how they turned out.  The Gemma uses a simplified (?) form of Arduino, and between the unicorn horn and this project, I'm starting to figure out how to tweak the code to get the lights to do cool things.  Each project is a little more exciting and a little fancier.

You know where this is all leading, right?  There will be a light-up swimming mermaid tail sometime in the not-too-distant future.  Oh, yes there will.


light-up boots


Thursday 17 October 2013

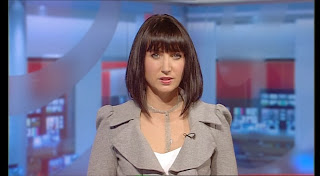
BBC Wales news presenter Lucy Owen always has great hair sporting a blunt bob complemented by a straight fringe but a recent trim has taken her hair to the next level. The short bob and fringe looks fantastic on her, why not try it yourself!?

Lucy Owen, From Longest To Shortest


Tuesday 15 October 2013

As the weather's started turning colder it's our newsreaders and weather presenters who've been turning heads with a serious amount of locks hitting the hairdresser's floor. We've made a list of brunette beauties below which we think illustrates our point!

Clare Nasir
Shorter and shorter for this stunning weather presenter. The question is, what style is next!?


Nina Hossain
A serious trim for the ITV newsreader, what a beautiful bob


Olivia Wayne nee Godfrey
Serious amount of length lost for Sky Sports News host


Saturday 12 October 2013

First of all an explanation for my American readers.  Here in the UK when we say coffee cake we mean a cake that is flavoured with coffee.  Makes sense to me!

Anyway, recently I was sorting through some family photos and came across this one of my mom.  From the colour of the mix in the food processor I knew immediately what she was making.  This coffee cake.  Among anyone who knew of her baking she was famous for this cake and it was SO easy!  I wonder if they all knew how easy it was if they would still have thought she was so amazing for making it.

052

I knew I had to make the cake yesterday and had all the ingredients in. I remembered how much butter, flour and sugar to each egg, that's easy, but I wasn't sure about how much coffee or baking powder and how long to cook it, but I had a go and it turned out ok.

DSCF6069-001

Pin It

You will find a printable version of the recipe at the bottom of the post.

First off, preheat your oven to 180c. (That's 360f for my American friends). I remembered that OK.
Now I had to decide how much mixture to make. I knew that when my mom made this cake it used to have a 6 egg mix but she had these HUGE cake tins. Since I only wanted to use 8 inch tins, I decided a 3 egg mix would be enough.

Whenever my mom made this cake she always took the time to grease AND flour the tins, so I did the same.

First, grease your tins as normal, then put a tbsp or so of flour into them, and tip the tin until you have coated all surfaces with the flour. I am sure cake release spray would do the same job BUT I am trying to stick to what my mom did here, so I went with greasing and flouring.

Coffee Cake 01

Coffee Cake 02

Coffee Cake 03

Measure your flour, baking powder, sugar and butter into the bowl of your processor and then add the 3 eggs, having cracked them into a bowl first in case you get a bad one or any shell falls in.

Coffee Cake 06

Before you start mixing the cake, make up your coffee. I am not sure I have the amount of coffee right. I have upped the amount slightly from what I used, in the recipe below, but think it might still need more. We had the amount in the icing right but the cake could have taken more coffee flavour. Add as little boiling water as you can to make it up and then thin it out a bit with cold water, which also brings the temperature down.

Coffee Cake 05

Now back to the food processor. Mix on med high (or pulse) until the mixture is combined and smooth. Then add the coffee in a thin stream through the spout on the processor.

Coffee Cake 08

After a few more seconds your mix should look something like this.

Coffee Cake 09

Divide the mixture between your two cake tins.

Coffee Cake 10

Spread it out in the tins as evenly as you can.

Coffee Cake 11

Then place them in the preheated oven.

Coffee Cake 12

Leave to cool in the tin for 5 minutes.

Coffee Cake 13

Remove from the tins to a cake rack and leave until completely cooled.

Coffee Cake 14

Once the cake has cooled ice the top. You do this before filling the cake because the whipped cream is soft and you might squish it out if you ice after filling it.
Make up another small portion of strong instant coffee, 1 tsp of granules with about 1tbsp water, then make up some icing using that as your liquid. While the icing is still wet, sprinkle the walnuts over the top. My mom always used walnut halves when possible and used one to mark each portion of the cake. I only had walnut pieces, so I sprinkled instead.

Coffee Cake 15

Once the icing has set nicely you can whip the cream and get ready to fill the cake. I used 300ml of double cream here and you can see from the later photos it is quite a thick layer. But maybe that is what makes this cake so nice.

Coffee Cake 17

Pop the top on and your cake is ready to serve. If not serving immediately, keep chilled because of the cream.

Coffee Cake 19

Was it good? Yes, amazing! Was it as good as I remember? Not quite, it came out a little dense but there are a couple of things I know were not quite right. First I was using free range eggs from a family member's chickens, and they were on the small side, I am sure slightly larger eggs would have made a difference. Secondly I made the coffee up with as little water as possible and I think it could have taken a tbsp or so more. Finally I couldn't remember how much baking powder my mom used and guessed. I have upped it slightly for the recipe below and hopefully with those 3 things it should come out much better next time.

Coffee Cake 20

Coffee Cake 23

DSCF6069-001

Printable version:

My Mom's Coffee Cake
Coffee Flavoured cake my mom used to make that was always a success no matter where we took it!

Prep Time: 15 minutes
Total time: 20 minutes

Serves: 8 decent slices

Ingredients:

6 oz self raising flour,
6 oz caster sugar,
6 oz soft margarine, (I used butter because it was what I had),
3 medium eggs,
2 tsp baking powder,
2 1/2 tsp instant coffee,
1/2 cup icing sugar, I didn't measure this,
Handful walnuts,
Whipping cream or double cream.

Instructions:

1. Grease and flour your cake tins.
2. Preheat the oven to 180c.
3. Set up your food processor with the normal blade.
4. Measure the first 5 ingredients directly into the bowl.
5. Take 1 1/2 tsp instant coffee and make up with a little boiling water.  Cool with a little additional cold water.
6. Switch your processor on to med high until all the first ingredients are mixed, then pour the made coffee in through the spout while the mixer is still moving.
7. Divide the mixture between your two tins and spread evenly in the tins.
8. Bake in the preheated oven until it begins to come away from the sides of the tin, is springy in the middle and a cake tester or fine knife blade comes out clean when inserted into the cake. For the size pans I used this took about 20 minutes, but I would recommend checking at about 15 minutes.
9. Remove from the oven and cool in the tins for 5 minutes.
10. Turn out onto a cake rack to cool completely.
11. Make up the remaining instant coffee with a little boiling water and a little cold to cool it back down.
12. Make up the icing sugar with as much of the coffee as you need to make a consistency that will spread easily but without being too runny.
13. Decide which of the cakes will be the top and spread the icing over it. Sprinkle the walnuts over that and leave to set.
14. Once the icing has set you can whip the cream and fill the middle of the cake. If your bottom cake is a bit uneven you may need to slice some off it to get it to sit flat first.
15. Keep chilled (because of the cream) and serve!


You can check out the sites I link up to over in my sidebar. Before you go, why not check out my recipes index page, or my craft projects index page, I am sure you will find something there to interest you.

Thursday 10 October 2013

I'm still carrying on with the Made eCourse.  Still up to date, although this week was hard.  We had to answer all sorts of questions for ourselves about ourselves.  Funnily the one about my skills and what I am good at was not a problem for me although others found that one difficult.  No, what I found difficult was the questions about our passions, about the things that excite or anger us.

I think I am still mask wearing a lot of the time because whenever I come to answer questions like this I don't know whether the things that come to mind are the real me or the answers I am giving because I think they are the acceptable ones.  Does that make sense?

So, the end of this week's class was to write a blessing over ourselves, and that's what I did, but I thought others might want to read this blessing over themselves too, so I am sharing.

Blessing 1

Pin It

Blessing 2

Blessing 3

May you know what it means to be loved.
May you know in the depths of your soul, the bravery of standing as who you are, the joy of removing that mask, the delight of tearing down those walls.
And yes, may you know too the fear that comes with that, for in knowing this fear and doing it anyway, we learn that we are loved.
May you know the fear of not being accepted, and step out anyway, because you know the One who ultimately accepts you.
May you know the fear of really being seen and step out into the light anyway, because you know the One who Is light.
May you know the anxiety that comes with trying something new, and try anyway because you know the one who promises to go with you.
May you know all these things because you began the journey of knowing what it means to be loved, a journey into the very heart of God.  A journey that begins with loving and accepting yourself.

~ Zoe Gregg
10th October 2013


You can check out the sites I link up to over in my sidebar. Before you go, why not check out my recipes index page, or my craft projects index page, I am sure you will find something there to interest you.
Monday 7 October 2013

I am still managing to stay more or less caught up with the made eCourse.  This coming week will be week 6 and I honestly don't think I have ever stayed caught up this long on any online course before.  That is an indication of how good this course is.

This week we were doing an art journal page based on the Proverbs 31 woman and taking a fresh look at her.

Proverbs 31 - Finished - Made eCourse

Pin It

I made a couple of alternations to the suggested supplies for this class.  Around the edge of the page there was supposed to be Washi tape and while there is a store locally that sells it I couldn't bring myself to buy any.  There wasn't a roll that really leapt out at me as the ONE I wanted.  So I grabbed a spare piece of the drop sheet from my desk and cut that into strips which I then glued around the edges, over the leftover ink from another project that was already there.

Proverbs 31 art journal page

Then I grabbed an old map I had in my stash, so put down on the page.

Proverbs 31 art journal page

Did you know old maps were on paper that was glued to a mesh fabric backing? No neither did I, but I tell you it is a gorgeous surface to work on.

Proverbs 31 art journal page

I glued that down and put a thin layer of gesso over it.

Proverbs 31 art journal page

Hmmm, think it's time to get a new pot of medium to use as glue. I resorted to cutting the top off this one to allow me to access every last bit. No wastage here.

Proverbs 31 art journal page

These are the colours I used for the face.  The class was taught using Copic markers, but I don't have any of those, so I used what I do have instead.  

Proverbs 31 art journal page

I did follow the directions of how she formed the face as closely as I could.  And yes, it scared me at first putting this big dark grey line in there!

Proverbs 31 art journal page

But once the colour started going on over it I began to see how it was working.

Proverbs 31 art journal page

I forgot to take a picture before I added the hair, you'll have to forgive me for that but I was so enjoying the process.
These are the colours I used on the hair, although the red proved too harsh and I dropped it in favour of an orange.

Proverbs 31 art journal page

Proverbs 31 art journal page

After that I added a black marker line around the edge, inside the line of paper. I feel like it really lifted the image.

Proverbs 31 art journal page

Finally I added some circles.

Proverbs 31 - Made eCourse

and some text inside the circles from the thoughts I had on the passage.

Proverbs 31 - Finished - Made eCourse

So, tell me. If I were to list this page on my Etsy store, would there be any interest? Or if I were to do a similar page without the text?


You can check out the sites I link up to over in my sidebar. Before you go, why not check out my recipes index page, or my craft projects index page, I am sure you will find something there to interest you.