Wednesday 30 November 2011

Referring to Luke 2:21-40


I cannot begin to imagine what it must have been like for Anna.  To have waited and waited and waited for God to show up.  Always waiting, staying faithful, never giving up, day after day after day.


And THIS day, when it started, probably seemed like every other day.  I wonder when she realised.  Was it the very moment Mary and Joseph entered the Temple, even though she couldn't see them yet?  Was it not until she caught sight of them or did it take a while of watching the family not yet understanding what it was that was stirring in her soul?


Whatever or however it came, that moment of realisation did come.
"This is it" the Holy Spirit whispered in her ear, "THAT child, He is the one you've been waiting for" and then He nudged her until she walked across and approached the family.


Waiting was over, anticipation was done, her joy was complete.  The Saviour had come!


Sunday 27 November 2011

holy experience


Loook, 2 weeks running!  How impressed with myself am I?  This week, in no particular order, I am thankful for . . . . 

446.  Both my sons.  The first doing an amazing degree in stage management and apparently having lots of fun but working very hard during show weeks (this week being one!).

447.  The second doing well at sixth form and winning a RECORD 7 awards (including student of the year) in the awards evening at his old school.

448.  Even though I don't drink tea or coffee, squash (cordial) that is nice hot means hubby has added a hot drink for me to his morning routine!

449.  Awesome day's training in child protection.  Came home with two things to implement ASAP, one of which we already have a plan to act on, even though training was only Saturday.

450.  Chocolate covered Brussels sprouts.  Heeheee.  I may write a blog post about that one later in the week!

451.  Open the Book is still going well.  The head teacher told us the other week that more staff make an effort to be at this assembly each week than ANY OTHER they do!  WOW.

452.  I was able to find a way to make the props for this week's Open the Book without me having to draw 10 huge pictures!

453.  Even though hubby had offered to let me have the car for the training day at the weekend, someone else offering to drive meant he was still able to have the car.

454.  Good bargains on ebay this week.  I needed some inkjet printable OHP sheets and Staples wanted £23 for their smallest box (25 sheets).  On ebay I managed to pick up a full unopened box of 25 plus an opened box with 17 still in it for less than £6.50 including postage!  NOT BAD.

455.  A school deciding they didn't want the Christmas assembly next week was actually a good thing as it means my incredibly manic week will be much less so!

456.  Sunday's Cool (say it out loud and you'll work it out) "Wall of Rejoicing" which was started yesterday is already filling up and will most likely expand past the edges of the noticeboard and onto the walls by the end of the 8 lessons it will be up for!

457.  The mild weather we seem to be having this year.  This time last year we had already had the first big freeze.  I don't mind some snow but last year was a bit much and it's nice to not have to worry about slipping and falling and so on.

458.  Having a washing machine.  I do remember what it was like before we got one and having to do laundry in the bath!  Don't think my back could cope with that these days.

459.  An interesting conversation last night about future possibilities.  Things MIGHT turn out to be better than people expect, if they'll just look more carefully at the details.

460.  ADVENT - a time of anticipation is HERE.  Come Lord Jesus, come Holy Spirit!

461.  

If you wish to participate in blogging about your list of 1000 gifts or in Thankful Thursday, you can do so by clicking on the banners at the top of this post.

Tuesday 22 November 2011

I am still making costumes and props for our Open the Book Team.  Open the Book is a program that takes weekly Bible Story assemblies into schools that are local to  the church providing the team.

So far, I have shared our first team photo (we were the 1000th team to be registered), quick and easy basic costumes, Joseph's Multi coloured coat and a basic male Egyptian costume as well as one or two props.

Today we have a black wig for an Egyptian princess because this week's story was about Moses being discovered in his basket floating on the water by Pharaoh's daughter.


I had looked in a number of places online for solutions for this part of this costume and got absolutely nowhere as far as making something is concerned.  I did read something about making fun play wigs for children using yarn and a baseball cap with the brim cut off.  I went through my yarn stash (what is left of it) and found that I did have some black yarn, but I couldn't find an old baseball cap, so I grabbed the next best thing, an old fleece hat.  Fleece is good for this because it won't fray when you cut it, whereas a knitted hat would.  You can see that I cut part of the fabric away.  This is part of the section that would be turned up when wearing the hat.  In the end I went back in and cut all of that section away, but it is up to you whether you do that.


I worked out and marked where each of the layers would be attached to the hat and began to cut yarn to double the length.  I then gathered a bundle of cut lengths together and tied them at the midway point, in a knot.  I used 4 strands together for the chunkier yarn and 7 for the Double Knit yarn.  This worked OK, but I soon worked out a better way.  Find or cut a piece of card (I used foam board that I happened to have) that is the length you want that layer of hair to be and wrap the yarn around and around and around it.


Don't go all the way across your card, you will need some space to section it off.  Also, do not wrap too tight, this will stretch the yarn and mean your finished product is not as long as you want.  Keep it only just tight enough to not slip but no more. Then, using a spare piece of yarn, gather the correct number of strands at one end of the board and slip the spare piece underneath them, tying it off.  Do this all the way across the board.


The simply slip your scissors under the strands of yarn at the other end of the board and cut across.  You will be left with lots of bundles of yarn.

Take your hot glue gun and begin attaching your bundles, at the knotted end, to the hat.  You can either go all the way around and cut a fringe in later or do what I did and leave space for the fringe.  Try and keep the tops of the yarn in as straight a line as possible and keep gluing.


On that photo you can see that I decided to do 4 layers of bundles, the bottom line you see there, the two lines you see marked, and the very top of the head.  To be honest this gave a very thick and full wig that feels a bit bulky when wearing and I would suggest that 3 layers in total would be enough.

This next photo show you how I tried to keep things even.  I would glue on the front ones on each side, the centre back ones, and then split each side into sections, gluing on one to mark the section first, then filling it in.  I made these later bundles slightly longer than the first one.


Keep going until you have your first three layers done, or two layers if you have decided on 3 layers in total.


Then you need to work on the fringe.  Obviously the fringe (bangs) needs to be long enough to cover the remaining edge of the hat, other than that it is up to you.  I did two layers in much the same way as the sides.


Then I trimmed the fringe to give as straight a finish as I could manage.  I don't think I would have made a very good hairdresser, ho hum.


That just leaves the top of the head to finish.


I decided that I would do the front and back section in slightly different ways.  Truly the easiest way to show you that is with a diagram, because if I try and explain it in words, it probably won't make sense.


Because I realised at this point that I had worked slightly lopsided, I made the two sides meet, slightly to one side of the seam line of the hat.  You need to be more careful with your glue now, making sure you cover up all the blobs of glue with the yarn, leaving none showing.  For me this worked best by working with two bundles of yarn at a time.  I applied a line of hot glue, across the seam line and then placed the two bundles into it, touching each other in the middle.


Keep going until you have covered the top of the head as shown in the diagram.  You may then want to trim the bottom of the hair to even it up a bit.  I did a little, but not too much.

Finally, I chose to braid some strands at the front on each side.  I did about 6 thin braids on each side.


And there you have it, an Egyptian Princess Wig.  


All in all it took me a total of about 3 hours, but if you dropped the one layer like I suggested, you could get it finished quicker than that, and it is the sort of work that can be done while watching TV as long as you have an electrical socket nearby for the glue gun.

It would work equally well in other colours for fancy dress costumes and so on.

If you put my wig together with my team members ability to put costumes together out of seemingly nothing, you get a fantastic result.


Next week I have no costumes to make, so if you check in here, there might be another craft project, or maybe some art journal pages.

Monday 21 November 2011

holy experience


WOW, I haven't done a thankfulness Journey post since before I went to Romania.  So this is well overdue.  Here is my entry for this week's Thankfulness journey, in no particular order.

I am thankful for . . . . 

434. The trip to Romania went well and I learnt a lot.

435.  Although we had to wait in baggage claim for 2 hours, ours bags were OK, and we got them eventually.

436.  There was time for work, teaching the classes we had intended to teach.


437.  And there was time for fellowshipping and seeing a little of what Romania had to offer.


438.  And there was time for tasty treats.


439.  But most of all it was a safe trip that began something that is hopefully continuing.

440.  On to more recent things . . . . Open the Book assemblies have begun and are going well, the children are really getting into the stories.

441.  I'm having fun making props and costumes for open the Book and any hot glue gun injuries have been minor!

442.  A fantastic weekend, with time spent with a good friend and growth in God.

443.  We were allowed to attend a breakfast for leaders in a nearby town despite the fact that we are not involved in that town in any way.

446.  I was able to clearly state what it is I do, no, who it is I really am, without fear and without embarrassment, fully believing what God has placed me here to do.

445.  My youngest son's last minute (well, 3 weeks notice) addition to the backing singers for a local amateur dramatics/light operatic society performance went well.  I have not seen him look that happy in a long time.  Who'd have thought you could mix 3 different Shakespeare plays, show tunes and our local industrial history?  But it worked!

446.  

If you wish to participate in blogging about your list of 1000 gifts or in Thankful Thursday, you can do so by clicking on the banners at the top of this post.

Saturday 19 November 2011

Just finished up this gorgeous Flower Faerie hoodie to ship off to the East Coast this morning.  This one was custom ordered with longer sleeves and no laces on the sides.  It's always fun to make modifications.  This is the second request I've gotten for no side laces and it makes it a rather different hoodie, I think.  Certainly it fits differently.  I like the clean lines of it quite a lot.

I'm also getting a little faster.  This one is my best seller and I've made quite a few of them at this point.  I think I maybe have shaved at least an hour or maybe two hours off the total creation time (so, down to 5-6 hours from 7-8 hours).  Details take time! 

(Also, the side laces take a lot of time.  Maybe that's why I finished this one so quickly)

I keep making teensy improvements too.  My serger does a lot of different types of seams and I keep changing my mind as to which seam type I like best for which seam.  I think my choices are getting better and better. 

For any sewing geeks who might be reading this, I use a Babylock Imagine serger.  It's got a feed differential, which means it can sew two pieces of fabric together at different "speeds" - i.e. it makes gathers or ruffles automatically.  The other cool thing it does is make "lettuce edges" if I sew just one layer of fabric on a stretch differential.  Like this.. see how the sleeve edge is wiggly?


Anyway, that's one thing I've started doing with the later versions of this hoodie, and I think it adds a lot.  Another thing is the way I assemble the wrist cuff.. the way I was doing it before, I ended up with a little uneven jag at the end of the wrist cuff, often as not, and I reworked it so the edges come out even and hidden this time.  It's those little things that make me so happy.


Friday 18 November 2011

Earlier in the week I showed you how we made the multi coloured coat for the Joseph story.  This week we finished off the Joseph story with what happened in Egypt.

I wasn't responsible for the Pharaoh costume but isn't it amazing.  A friend did this.  The instructions for the head dress are available to Open the Book Team Members in the UK via the resources pages on the members section of the website.


The costume I was responsible for was When Pharaoh makes Joseph second in command.  We needed something he could put on easily.  This is what we came up with.


If you didn't have a fancy fabric, like we had for Pharaoh, you combine this with the head dress for a Pharaoh costume.

That is a very basic cloak, but with an extra cream coloured strip down each side of the front edges.  Open the Book Team Members, this is the pattern from the website with just simple straight strips attached to each side of the front.  What really makes this costume is the collar and the belt.

They are actually quite simple.

Let's start with the collar.  You need two curved pieces of fabric the same size and shape.  So I started with my fabric doubled.


Here, you can see that I had already marked the outside of the curve (Well, half of it, but you will see why that is later).  I don't have a pair of compasses big enough to do that so let me show you how I did it by marking the inner curve.


Please excuse my burnt ironing board cover, ooops.
I wanted the radius of this semi circle to be 4 inches, so I kept the 4 inch mark on my ruler on the spot I had already marked as the centre, then swivelled it around and made a set of pencil marks at the corner of the ruler.


I joined those marks up to complete the line.  The reason I only marked half of the semi circle is because I was then going to fold the fabric in half again and cut through all 4 layers together to ensure that both panels matched and that both sides of each panel matched.


Next you need a piece if interfacing the same shape but slightly smaller all round.  The easiest way to do that was to draw around one of the pieces onto the interfacing, then mark where I wanted to trim it, to make it smaller, and cut that.


Iron the interfacing onto the wrong side of one of your pieces of fabric, keeping it in the middle so that there is an even strip around all edges that does not have interfacing on it..


Next you will need some ties.  You can use ribbon, cord, or whatever you have on hand that will work.  I still had some bias binding left over from neatening the edges of the robe, so I took that, folded it in half and sewed along it's length, then cut the pieces that I needed.

Take the piece of fabric with the interfacing on and place it right side up, so that the interfacing side is down. On top of that place the other piece of fabric, right side down, so that the right sides are together.

Now position your ties.


You want them near the inner edge of the straight ends of your semi circle.  Position them so that the bulk of their length is between the two layers of fabric, then fold your fabric back and pin in place.


Sew around both straight ends, and the long edge of the curve, leaving the short edge unsewn for now.  Make sure you do not catch the ties in any other point on the seam except where you have them pinned.

Next you will need to clip your curve.  Cut from the edge of the fabric a few millimetres in towards the stitching line.  You want to get close to the stitching but not all the way up to it.


Turn the fabric through so that the right sides are now outside and push out the corners.  I find a chopstick works really well for this.  Then press your piece flat with a hot iron.  If you having trouble getting the curved seam to sit flat right on the seam line, try rolling it between your finger and thumb.  Once pressed, it should look like this.


Now clip in inner curve in the same way you clipped the outer curve, but slightly smaller cuts.  You can either mark the line that you will fold on or use the edge of the interfacing as your line.

I found the easiest way to then press this curve in, was to work on one side, then flip it over and work on the other side, but you could do whatever works for you.


Top stitch along that curve, close to the edge.


Your final job is to attach all the buttons that will really make this costume what it is.

I bought a pack of large cream buttons and supplemented this with buttons from my button box.  First of all I laid them out in a pattern on both the collar and the belt, then hot glued them in place.  You could stitch each of them individually, but that was going to take far too long.

If you do choose to hot glue them, BE CAREFUL, hold the buttons by their edges only, especially when pressing them down onto the fabric.  If you press in the middle, well, let's just say those buttons have holes in the middle that hot glue can squeeze up through.


The belt is made in much the same way but much easier.

One large rectangle of fabric, folded in half.  Attach the interfacing to just one half, sew along the long edge, turn through and press, turn the fabric under at the ends, tuck just a bit of your ties inside, leaving the length outside and top stitch. For the belt I used two ties at each end, but if one works for your that's fine.  For the ties on the belt I used some ribbon that I had to hand.  The buttons are attached in the same way.  And there you have it, an Egyptian costume!


Right now I am working on another Egyptian costume, a long black wig made from an old hat and black yarn, for the Egyptian Princess who rescues baby Moses from the water.  I hope to have a post about that up next week.

Wednesday 16 November 2011

How do you go from this:

To this:


It's not all that difficult actually, as long as you have a sewing machine that will do stretch stitches for knit fabrics and a good pair of scissors you should be fine.  Please excuse the quality of the photo, we have a teacher taking photos from the back of the assembly hall, and I forgot to ask her to get a good shot of the coat.  I am making these bible costumes for use in our local school.  A team from the church I attend are doing weekly Bible Story assemblies under the Open The Book scheme.  We are up to the story of Joseph . . . .


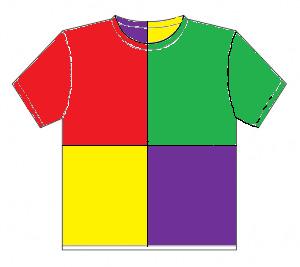
You need 4 or 5 T-shirts in bright colours.
All the same size and fit.  I made the mistake of not checking the fit, so while they were all X-Large, some were slim fit and some were loose fit.  If you make sure they all match it will be much easier.  We bought ours from Primark and 5 T-shirts came to just £11.

I took all the shirts and with my large cutting mat, quilting ruler and rotary cutter, cut each shirt into a top and a bottom, about 4 or 5 inches below the armpits.  You could do this with scissors too.

Decide which two colours you want for the front and cut up the middle of the front, along the side and underarm seam, and the along the shoulder seam and out through the halfway point of the sleeve, like so:


The two colours you are using for the back, will get the same cuts along the side, but the top to bottom cut will be through the centre of the back.  You will be left with pieces that look as follows but in 4 different colours:

Place one back down, right side up, on top of it place the front for that side of the coat, right side down, keeping right sides together. Sew the shoulder seam and the top of the arm, on both sides of the coat.  Do not sew the underarms and side seams yet.

# Before we sew the side seams we want to lengthen the sleeves.  So, cut the sleeves off the tops of the T-shirts along the seam.  Both the whole sleeves and the 4 half sleeves.  You then need to cut a strip off the bottom of the sleeve that is the largest you can cut but keeping it the same width all the way along.  i.e. following the red lines below.  Then you need to take that loop you have created and cut it open along the seam line.You may need to trim the ends so that your strip is square at each end.


You can either keep each one together, or cut them in half and match back up with other colours so that the front and back are different.  I actually used both methods, keeping the front and back of the sleeve together  for some colours, and mixing for others.

You will need to sew using a stretch stitch, or if your machine does not have those a zig zag stitch.  I used an overlock (serge) stitch to attach and tidy in one go.  Keep your seams fairly narrow, you don't want to lose too much of the fabric.

Keeping right sides together always (not always easy to spot when sewing T-shirts) sew extra layers onto each sleeve.  I sewed an extra 2 layers, but could easily have done 1 more if not 2, as I had 5 T-shirts.  As it is I think the sleeves are long enough for something that is only ever going to be worn a handful of times for less than 5 minutes at a time.  If you are making something for a whole show, you may want to make the sleeves longer by adding those extra layers.

Repeat with the other side of the coat.  Then sew together down the centre back, again with right sides together.


Once all that is done you can then sew up the side seams and along the underarm seam, keeping right sides together.


You do not need to neaten the front edges, unless the coat is going to be used often.  As a knit fabric the T-shirt material will not fray.

Now go back to your pile of fabric and choose the 4 colours for the next layer.  You need the bottom halves, that you have already cut off for this, straight up a side seam and then straight up the middle, front or back.
Choose your 4, all the time thinking about not putting colours right next to the same colour, either on this row or on the previous row.

Keeping right sides together, sew two pieces together at the side seams, the same with the other side, then sew both of those together at the centre back as you did with the top part.
Once you have your 4 panels together, THEN place right sides together with the top of the coat, and sew all the way around.  By now you will have something that looks a bit like this:

Now you will add another two layers using more or less the same method above, except that we want to widen the coat as it goes down, so you will need to cut your panels slightly differently.
Each panel now needs to be the same width as the panel above it at its top edge, but wider at the bottom edge.  You can cut these panels from what is left of the T-shirts, either using the bottoms or using the pieces of the top that you still have left.

I went back to using my cutting mat, ruler and rotary cutter so that I knew my angled lines would still be straight but you should be able to do this with scissors if you are careful.

You will now have 4 panels that are square on one end but angled on the other as shown above.  Keeping the square edges to be the centre front and centre back, and right sides together, sew your 4 panels together in one long strip, then sew that strip to the bottom of the coat you have completed so far.

Repeat the last row again, but remembering that your panels will need to be wider still as you still want the coat to widen as it goes down.  So cut your panels so that the top of the new layer matches in width the bottom of the previous layer.


Neaten the bottom if you need to, although I managed to work mine so that each of the bottom pieces had T-shirt hem at its bottom edge and did not need to neaten.


It might look like it needs to be longer but the teacher who was playing the part of Joseph is very tall and I was aware that other people will be using the coat at other times, and did not want them to be tripping over the hem.  if you feel you have enough fabric for another layer and want to do that, then just follow the same method you used for the last two layers.


A child's version of this costume could be made by using children's T-shirts in a couple of sizes bigger than the child normally wears.