 23:30
23:30
 Unknown
This is my page from Week 11 of Life Book. I sometimes do lessons out of order, either because I need to get some supplies or because I need to print something out in order to do the lesson and so on. I did week 10 after this page and will share that soon. This was one of the mini, infill lessons and focussed on stencilling to cover most of the page.

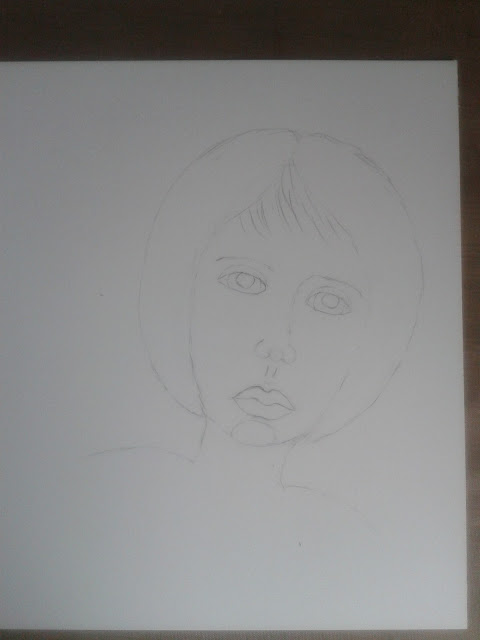
 I started with pencilling in the face.

I really struggled with the lips, trying over and over again and I still didn't get them right. Oh well, keep trying and keep learning, that's what lessons are all about.
If you checked out my last Life book Page you will know that was in honour of getting my hair cut short to benefit two charities. This page, I decided to do with short hair in honour of my newly short hair.
Next I coloured in the face using watercolour crayons, and a graphite pencil.

Two of the Life Book teachers had supplied stencil templates for you to make your own stencils, but I had enough of my own. I don't have any purchased spray inks, so have to make my own and they don't always work as well as the purchased ones. Particularly when flipping over the stencil to put the negative image down somewhere else on the page. It tends to just splodge! I like that word, SPLODGE!

If you look in the picture above, to the top right corner, that's a flipped over stencil, and the bottom right, where it is purple. Also, some of the colours I have made into spray inks, were too wet and just seeped under the edges of the stencil, such as the pink down the left hand side. If I had the money I would invest in some spray inks, but I don't. However, if anyone wants to buy me some arty gifties, I would be more than happy to receive them. GRIN!
I did cheat with the black, and use a sponge to put paint on through the stencil, rather than spray ink. I like the clarity that gives to the image, the crisp edges. I looked at it and decided that there were still some areas that needed a little more stencilling and went in with a final layer of blue, again, paint sponged through a stencil.
You might notice I have adjusted the nose very slightly to make it on more of the right angle across the face. I also painted her hair at this point. I decided to go for grey hair.

I used a layer of iridescent white all over the hair, then highlighted it with grey and with white. I struggle with her eye lashes. On the right hand eye (as you look at the picture) I got them just right, nice and thin with just the right flick that I wanted. But the other eye, they kept coming out thicker. I tried turning the paper around, but then I couldn't get the flick right because I was working upside down. So I did what I could and left it at that.
Overall, for a fill in page that was really more about techniques than anything else, I am pleased with it.
You can check out the sites I link up to over in my sidebar. Before you go, why not check out my recipes index page, or my craft projects index page, I am sure you will find something there to interest you.


I really struggled with the lips, trying over and over again and I still didn't get them right. Oh well, keep trying and keep learning, that's what lessons are all about.

If you checked out my last Life book Page you will know that was in honour of getting my hair cut short to benefit two charities. This page, I decided to do with short hair in honour of my newly short hair.
Next I coloured in the face using watercolour crayons, and a graphite pencil.

Two of the Life Book teachers had supplied stencil templates for you to make your own stencils, but I had enough of my own. I don't have any purchased spray inks, so have to make my own and they don't always work as well as the purchased ones. Particularly when flipping over the stencil to put the negative image down somewhere else on the page. It tends to just splodge! I like that word, SPLODGE!

If you look in the picture above, to the top right corner, that's a flipped over stencil, and the bottom right, where it is purple. Also, some of the colours I have made into spray inks, were too wet and just seeped under the edges of the stencil, such as the pink down the left hand side. If I had the money I would invest in some spray inks, but I don't. However, if anyone wants to buy me some arty gifties, I would be more than happy to receive them. GRIN!
I did cheat with the black, and use a sponge to put paint on through the stencil, rather than spray ink. I like the clarity that gives to the image, the crisp edges. I looked at it and decided that there were still some areas that needed a little more stencilling and went in with a final layer of blue, again, paint sponged through a stencil.
You might notice I have adjusted the nose very slightly to make it on more of the right angle across the face. I also painted her hair at this point. I decided to go for grey hair.

I used a layer of iridescent white all over the hair, then highlighted it with grey and with white. I struggle with her eye lashes. On the right hand eye (as you look at the picture) I got them just right, nice and thin with just the right flick that I wanted. But the other eye, they kept coming out thicker. I tried turning the paper around, but then I couldn't get the flick right because I was working upside down. So I did what I could and left it at that.
Overall, for a fill in page that was really more about techniques than anything else, I am pleased with it.
You can check out the sites I link up to over in my sidebar. Before you go, why not check out my recipes index page, or my craft projects index page, I am sure you will find something there to interest you.
 Posted in


.jpg)


0 comments :
Post a Comment